Dwellness™ • Rifton Activity Chair Transfers
Rifton Activity Chair Transfers
Dwellness™ customization for:
Your Patient
Rifton Activity Chair Manual (PDF)
General Principles
[NOTE: Before you undertake this routine, please study and practice the principles of Safe Body Dynamics for your patient’s transfers and ambulation.]
→ Breathe! Never hold your breath and bear down when exerting yourself ←
→ Stretching helps prevent injury… stretch before work, and stretch every day ←
→ Keep a low center of gravity during transferring or lifting ←
→ When not transferring or lifting, stand and walk fully erect with abdominals engaged ←
→ Think carefully about each move you make ←
→ Prompt your patient's movements, prepare, and wait for a response before moving yourself ←
→ When in doubt, pause and reconsider your next move ←
→ If your patient decides to go down to the floor, do not resist; gently lower your patient ←
Daily Routines
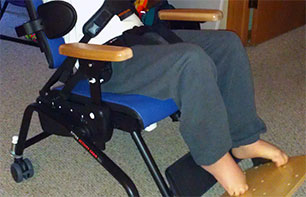
Morning seating- The Rifton Activity Chair is the best choice for seating first thing in the morning
- Position the Rifton chair
- Place the Rifton chair for your patient to approach it from the side, not front
- Rifton chair should be upright, with footplate flat on the floor
- Lock the two front wheels
- Execute the Safe Walk toward the Rifton chair
- Approach with steps that result in the inside foot on the footplate
- From the left side of the Rifton chair, place the right foot first
- From the right side of the Rifton chair, place the left foot first
- With your patient's inside foot placed on the footplate, rotate toward the inside foot and have your patient sit on the edge of the Rifton chair
- Scoot your patient back until your patient's hips and back are against the back of the Rifton chair
- Secure your patient in the Rifton chair
- Apply the hip positioning belt
- Bring the harness down over your patient's head and secure the side straps
- Tilt the Rifton chair backward all the way
- Tighten the harness straps with the buckles behind your patient's shoulder
- Do not tighten the harness straps around your patient's waist
- Make your patient comfortable in the Rifton chair
- Place a pillow on the footplate and raise it so it clamps onto the pillow under your patient's feet
- Position your patient's neck pillow and secure it with the stretch band
- Place a rolled up towel next to your patient's left thigh (it helps your patient stay upright, considering your patient's scoliosis leans your patient toward your patient's right side)
- In colder weather, place a blanket on your patient's lap and tuck it in so it stays in place
- Whenever your patient is seated next to the caregiver chair, place chucks on the floor under your patient
- In case of briefs leaking
- In case of food or medicines spilling
[NOTE: About 10%; of the time, he may have a neurological physical "stutter" with your patient's left foot. When your patient initiates your patient's left foot to step, your patient's left foot does a slight spasm and your patient can’t place it squarely on the floor. Sometimes your patient tries to put weight on your patient's left foot, which does not hold your patient. For a moment you might have to help your patient keep standing. Your patient always recovers from this quickly and continues to step either on your patient's left or your patient's right foot. Keep steady and encourage your patient to keep walking.]
→ CAUTION: Be sure that the harness in front does not press against your patient's throat — if it does, then readjust the harness to keep it clear. ←
[NOTE: I am right-handed. If you are left-handed, you may choose to reverse the steps in this process. Do what is most comfortable for you.]
Getting your patient out of the Rifton Activity Chair
→ CAUTION: Before moving your patient out of any chair or seating, ALWAYS visually check the G-tube to make sure you haven’t forgotten to remove the extension. It’s easy to forget, and the G-tube will actually pull out of your patient's gut if the extension gets snagged as you remove your patient from a chair. ←
- Position the chair
- Check to be sure the G-tube extension is removed!
- Put the Rifton chair in the desired position and lock the two front wheels
- Keep it tilted back for your patient's comfort while you get your patient ready to stand up
- Remove any comfort items — pillows, blankets, towel, etc.
- Tilt the chair forward until the foot plate is level
- Lower the foot plate to the floor, making sure it’s flush on the floor
- Remove the shoulder harness by loosening the buckles behind your patient's shoulders, disconnecting the buckles along your patient's sides, and gently bringing the harness up over your patient's head
- Loosen the lap positioning belt and unlock it
- Wait until he’s ready to stand up, then guide your patient out of your patient's chair
- Use Safe Body Dynamics for your walk
Dwellness input from HPCA and family caregivers can serve to improve the ongoing support system. Feel free to speak up!