Dwellness™ • Wheelchair Transfers
Wheelchair Transfers
Dwellness™ customization for:
Your Patient
Zippie IRIS Wheelchair Manual (PDF)
General Principles
[NOTE: Before you undertake this routine, please study and practice the principles of Safe Body Dynamics for your patient’s transfers and ambulation.]
→ Breathe! Never hold your breath and bear down when exerting yourself ←
→ Stretching helps prevent injury… stretch before work, and stretch every day ←
→ Keep a low center of gravity during transferring or lifting ←
→ When not transferring or lifting, stand and walk fully erect with abdominals engaged ←
→ Think carefully about each move you make ←
→ Prompt your patient's movements, prepare, and wait for a response before moving yourself ←
→ When in doubt, pause and reconsider your next move ←
→ If your patient decides to go down to the floor, do not resist; gently lower your patient ←
[NOTE: The wheelchair is obviously necessary for any activity outside of the home, but it is also necessary to provide a secure and healthy seating alternative to the Rifton chair. Providing a variety of seating positions can help prevent any skin breakdown or shearing.]
Daily Routines
Transfer into the wheelchair- The wheelchair is a very secure and healthy seating alternative in the home
- The wheelchair is necessary for any activities outside the home
- "Dress" the wheelchair
- Fold a chuck over about 1/3, with the absorbent side out
- Place the chuck on the wheelchair seat with the folded end going up the back
- Fold a black towel in half the long way
- Place on the wheelchair seat over the chuck and tuck the towel and chuck into the sides of the wheelchair seat — be sure the covering is secure and won’t slide
- Position the wheelchair
- Place the wheelchair so your patient can approach it from the side
- Put the wheelchair in the fully-upright position
- Place the step in front of the wheelchair, with one end just under the front of the seat between the wheels
- Put your patient into the wheelchair
- Use Safe Body Dynamics to walk your patient to the wheelchair
- Stop next to the step, at right angle to the step and chair
- Place your patient's left foot on the step and have your patient step up
- Immediately prompt your patient's right foot the step as close the wheelchair as possible
- Reach your left hand in front of your patient and guide your patient's right foot as close the seat as possible
- Guide your patient firmly into a seated position, as far back into the seat as possible
- Position and secure your patient in the wheelchair
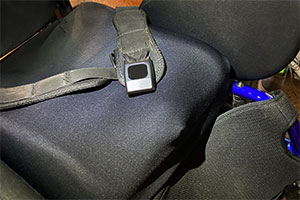
- As soon as your patient is seated, secure the hip positioning belt ("seatbelt")
- Tilt the wheelchair all the way back
- Use gravity to make sure your patient's hips are centered and your patient's body is aligned correctly
- With the wheelchair still tilted back, secure the harness
- Be sure the harness is routed alongside your patient's body; not over wheelchair parts
- Secure the footplate
- Tilt the wheelchair forward
- The standard angle of tilt that is safe and comfortable is 25° to 30°
- The angle can be varied depending on your patient's needs at the moment
- If your patient is having trouble swallowing your patient's secretions and is getting congested, tilt your patient more upright
- If your patient's airway is clear and your patient needs some change in position for your patient's skin health, tilt your patient back
- Position your patient's neck pillow and secure it with the stretch band
- Whenever your patient is seated next to the caregiver chair, place chucks on the floor under your patient
- In case of briefs leaking
- In case of food or medicines spilling
[NOTE: About 10% of the time, your patient may have a neurological physical "stutter" with your patient's left foot. When your patient initiates your patient's left foot to step, your patient's left foot does a slight spasm and your patient can’t place it squarely on the floor. Sometimes your patient tries to put weight on your patient's left foot, which does not hold your patient. For a moment you might have to help your patient keep standing. Your patient always recovers from this quickly and continues to step either on your patient's left or your patient's right foot. Keep steady and encourage your patient to keep walking.]
→ CAUTION: Any change in angle requires that you watch your patient carefully and listen to your patient's breathing and voice. Be aware of any signs of discomfort or congestion, and change your patient's position or remove your patient from the chair if necessary. ←
[NOTE: I am right-handed. If you are left-handed, you may choose to reverse the steps in this process. Do what is most comfortable for you.]
Leaving Home
→ CAUTION: Dress your patient appropriately for the weather. Always be aware of the present conditions, and the forecast. He is especially sensitive to extremes of heat and cold. During the coldest weather, not only does your patient need to have full coat and hat protection, but your patient needs a scarf over your patient's entire face as your patient goes out. This is to protect your patient's lungs. In the hottest weather, your patient needs air conditioning whenever possible. Be ready with extra water for your patient's g-tube. Be ready with a spray bottle to cool your patient's skin. ←
→ CAUTION: Whenever there is extreme weather and you are going out in the van, use remote start to prepare the internal environment of the van. Start the van remotely, but be aware that the van will automatically stop again after 15 minutes. Plan accordingly. ←
- Going out and down the ramp
- Open the front door and prop open the storm door
- Align the wheelchair with the threshold and tilt back on the rear wheels
- Gently bump over the threshold and onto the front stoop
- Place the wheelchair back onto both wheels and carefully go down the ramp
→ CAUTION: Whenever the surface outside is snowy, or the wheelchair is moving over any surface that makes it harder to push, tilt the wheelchair back and focus pressure on the rear wheels. This will give more leverage and traction. ←
→ CAUTION: Always check the ramp to be sure that it is not slippery. In winter, check for snow or ice. If there is snow or ice on the ramp, use the broom to sweep off snow, and if necessary use chemicals to de-ice the ramp before walking on it. ←
- Going up the ramp and into the house
- Position the wheelchair at the base of the ramp
- Prop open the storm door, and open the front door
- Push the wheelchair up the ramp, onto the stoop
- Tilt the wheelchair back onto the rear wheel
- Place the front wheels over the threshold and bump the rear wheels against the step
- Leverage onto the front wheels, and lift the rear wheels into the house
→ CAUTION: Before moving your patient out of any chair or seating, ALWAYS visually check the G-tube to make sure you haven’t forgotten to remove the extension. It’s easy to forget, and the G-tube will actually pull out of your patient's gut if the extension gets snagged as you remove your patient from a chair. ←
- Position the wheelchair
- Check to be sure the G-tube extension is removed!
- Put the wheelchair in the desired position and lock the brake
- Keep it tilted back for your patient's comfort while you get your patient ready to stand up
- Lift the foot plate, being careful that the edges don’t hurt your patient's feet
- Loosen the lap positioning belt, but keep it locked
- Remove the neck pillow
- Remove the shoulder harness, either by disconnecting the buckles, or gently ease your patient's hands and arms out of the harness
- Double-check that the lap positioning belt is still attached
- Slowly tilt the wheelchair forward all the way
- Help your patient sit upright, and disconnect the lap positioning belt
- Wait until your patient is ready to stand up, then guide your patient out of your patient's chair
- Use Safe Body Dynamics for your walk
[NOTE: To slip out of the harness while it's attached, concentrate on moving your patient's elbow, not your patient's hand. If the elbow is all the way back, the hand easily slips out.]
[NOTE: About 10% of the time, your patient may have a neurological physical "stutter" with your patient's left foot. When your patient initiates your patient's left foot to step, your patient's left foot does a slight spasm and your patient can’t place it squarely on the floor. Sometimes your patient tries to put weight on your patient's left foot, which does not hold your patient. For a moment you might have to help your patient keep standing. Your patient always recovers from this quickly and continues to step either on your patient's left or your patient's right foot. Keep steady and encourage your patient to keep walking.]
Dwellness input from HPCA and family caregivers can serve to improve the ongoing support system. Feel free to speak up!